Tutorial for Creating Bootskins
This turorial shall be a little help for creating bootskins.
I'll try to describe with an example how I myself create my bootskins. Of course there may be other ways or special programs to do this, but this will not be mentioned.
Please find links to other descriptions at the bottom of this page.
The most important files described here may be downloaded directly for free use. (right mouse click - save target as..)
Requirements:
You need a picture editing program like e.g. the freeware programs The Gimp or Paint.Net, or the commercial program Paint Shop Pro, which is now offered by Corel.
Very useful is the free picture viewer IrfanView with a lot of handy functions, which you can grab from my Download Site .
Picture formate:
A bootskin normally consists of 3 files: the background picture (sunset2.bmp), a progress bar (s2progress.bmp), and a ini-file, named bootskin.ini.
The image files have to be saved in the bmp format.

The background picture (sunset2.bmp) must have a size of 640 x 480 pixel and a color depth of 4 bit (16 colors). The reason is that during boot of the computer no grapical driver is loaded. The bootscreen therefore has to be displayed in VGA mode and can only show a resolution of 640 x 480 pixel and max 16 colors (4 bit). This very poor resolution is the reason for the problems to make good bootskins which are not coarse-grained.
Realization:
As a basis you can use every picture you want but you should check if the picture is good enough concerning resolution and overall impression as a bootskin. You may edit the pictures in jpg formate or in bmp formate and transfer them afterwards with IrfanView to the necessary size and color depth. It is recommended to save the picture in bmp formate (IrfanView - save as - choose bmp) and to check with 640 x 480 pixel and 16 colors, if it suits for a bootskin.
To check this open the picture with Irfanview and choose Image - Resize/Resample - Set new size - 640 x 480 Pixel - OK.
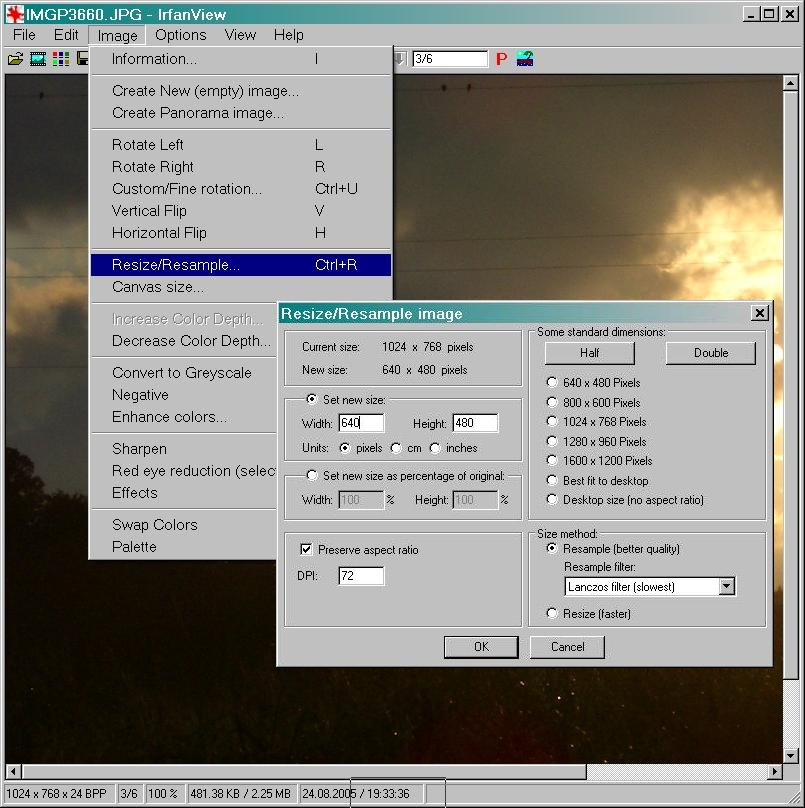
Then choose at Image - Decrease Color Depth - 16 Colors (4BPP) - OK and save the picture using a new name.

Start your picture editing program, here it is Paint Shop Pro, and open the following files:
Your background picture, here: sunset2.bmp
or an empty background picture, here: basis.bmp
the progress bar, a field for the running bar
den running bar, here :s2progress.bmp
the Microsoft writing 1)
the Copyright notation
and the Windows XP writing. 1)
1) Microsoft and Windows XP are registered trademarks of Microsoft Corporation

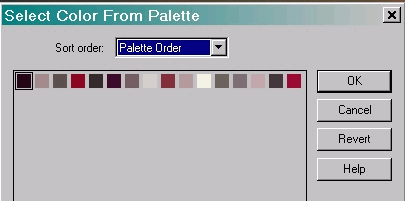
! ! ! It is very important that you use the same color palette for all pictures, they all must consist of the same 16 colors. ! ! !
You save the color palette of the background picture separately, e.g. with Irfanview (Image - Palette - Export Palette) or Paint Shop Pro (Colors - Save Palette), and load it new again for every used picture by choosing the picture and opening the color palette.
An easier way is to copy the desired picture, e.g. the XP writing, and paste it to the background picture. It should then adopt automatically the picture palette of the background picture.
This is not possible with the progress bar because it has to be saved as a separate picture. But it is extremely important that this bar uses the same color palette as the background picture, otherwise the bootskin will not run or has distorted colors. So choose the file (here s2progress.bmp), load the color palette and save the progress bar under a new name. Of course you can choose the colors from the palette as you want.
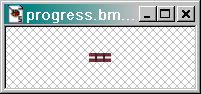
The progress bar always exists. There are bootskins where you will not see a progress bar, nevertheless it is existing. Mostly it has the color of the background, so it cannot be seen.
Now you can design your bootskin as you like and save the skin.
Check if the background picture and the progress bar have a color depth of 4 bit (16 Farben) and if the background picture has a aize of 640 x 480 pixel, typical size of this file is 153.7k.
Create a folder on your PC with the name of your bootskin and save the files to this folder.
Now you have to edit the text file bootskin.ini:
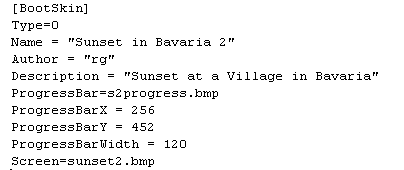
change the following entries:
Name: name of your bootskin
Author: your name
Description: short description of the bootskin
ProgressBar: name of the progress bar, e.g. s2progress.bmp
ProgressBarX: position from the picture's left side of the left upper corner of the progress bar in your background picture
ProgressBarY: position from the picture's top of the left upper corner of the progress bar in your background picture
Screen: name of the background picture, e.g. sunset2.bmp
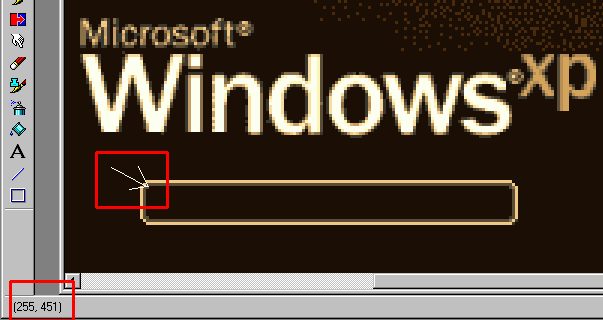
ProgressBarX = 255
ProgressBarY = 451
The rest remains unchanged.
Save the file as "bootskin.ini" to the folder of your bootskin.
Now you have to compress the file with a zip program like Winzip or PowerArchiver.
The format must be .zip, not .rar or others!
You then get a file like "Your-Bootskin-Name.zip". This file has simply to be renamed to "Your-Bootskin-Name.bootskin".
With a double click on this file the program Bootskin starts.
Mark the new skin as 'aktive' and reboot Windows.
If my description was correct and you made no mistake the new bootskin should appear at the Windows start sequence.
If you want you can offer your bootskin to the general public at WinCustomize.com.
You have to register for free to do so.
If you find a mistake or a better way to create bootskins, please send me a short note.
More Links for making Bootskins:
http://www.wincustomize.com/Articles.aspx?AID=97764
http://www.wincustomize.com/Articles.aspx?AID=58737
http://www.joeuser.com/index.asp?AID=1886
I'll try to describe with an example how I myself create my bootskins. Of course there may be other ways or special programs to do this, but this will not be mentioned.
Please find links to other descriptions at the bottom of this page.
The most important files described here may be downloaded directly for free use. (right mouse click - save target as..)
Requirements:
You need a picture editing program like e.g. the freeware programs The Gimp or Paint.Net, or the commercial program Paint Shop Pro, which is now offered by Corel.
Very useful is the free picture viewer IrfanView with a lot of handy functions, which you can grab from my Download Site .
Picture formate:
A bootskin normally consists of 3 files: the background picture (sunset2.bmp), a progress bar (s2progress.bmp), and a ini-file, named bootskin.ini.
The image files have to be saved in the bmp format.
The background picture (sunset2.bmp) must have a size of 640 x 480 pixel and a color depth of 4 bit (16 colors). The reason is that during boot of the computer no grapical driver is loaded. The bootscreen therefore has to be displayed in VGA mode and can only show a resolution of 640 x 480 pixel and max 16 colors (4 bit). This very poor resolution is the reason for the problems to make good bootskins which are not coarse-grained.
Realization:
As a basis you can use every picture you want but you should check if the picture is good enough concerning resolution and overall impression as a bootskin. You may edit the pictures in jpg formate or in bmp formate and transfer them afterwards with IrfanView to the necessary size and color depth. It is recommended to save the picture in bmp formate (IrfanView - save as - choose bmp) and to check with 640 x 480 pixel and 16 colors, if it suits for a bootskin.
To check this open the picture with Irfanview and choose Image - Resize/Resample - Set new size - 640 x 480 Pixel - OK.
Then choose at Image - Decrease Color Depth - 16 Colors (4BPP) - OK and save the picture using a new name.
Start your picture editing program, here it is Paint Shop Pro, and open the following files:
Your background picture, here: sunset2.bmp
or an empty background picture, here: basis.bmp
the progress bar, a field for the running bar
den running bar, here :s2progress.bmp
the Microsoft writing 1)
the Copyright notation
and the Windows XP writing. 1)
1) Microsoft and Windows XP are registered trademarks of Microsoft Corporation
! ! ! It is very important that you use the same color palette for all pictures, they all must consist of the same 16 colors. ! ! !
You save the color palette of the background picture separately, e.g. with Irfanview (Image - Palette - Export Palette) or Paint Shop Pro (Colors - Save Palette), and load it new again for every used picture by choosing the picture and opening the color palette.
An easier way is to copy the desired picture, e.g. the XP writing, and paste it to the background picture. It should then adopt automatically the picture palette of the background picture.
This is not possible with the progress bar because it has to be saved as a separate picture. But it is extremely important that this bar uses the same color palette as the background picture, otherwise the bootskin will not run or has distorted colors. So choose the file (here s2progress.bmp), load the color palette and save the progress bar under a new name. Of course you can choose the colors from the palette as you want.
The progress bar always exists. There are bootskins where you will not see a progress bar, nevertheless it is existing. Mostly it has the color of the background, so it cannot be seen.
Now you can design your bootskin as you like and save the skin.
Check if the background picture and the progress bar have a color depth of 4 bit (16 Farben) and if the background picture has a aize of 640 x 480 pixel, typical size of this file is 153.7k.
Create a folder on your PC with the name of your bootskin and save the files to this folder.
Now you have to edit the text file bootskin.ini:
change the following entries:
Name: name of your bootskin
Author: your name
Description: short description of the bootskin
ProgressBar: name of the progress bar, e.g. s2progress.bmp
ProgressBarX: position from the picture's left side of the left upper corner of the progress bar in your background picture
ProgressBarY: position from the picture's top of the left upper corner of the progress bar in your background picture
Screen: name of the background picture, e.g. sunset2.bmp
ProgressBarX = 255
ProgressBarY = 451
The rest remains unchanged.
Save the file as "bootskin.ini" to the folder of your bootskin.
Now you have to compress the file with a zip program like Winzip or PowerArchiver.
The format must be .zip, not .rar or others!
You then get a file like "Your-Bootskin-Name.zip". This file has simply to be renamed to "Your-Bootskin-Name.bootskin".
With a double click on this file the program Bootskin starts.
Mark the new skin as 'aktive' and reboot Windows.
If my description was correct and you made no mistake the new bootskin should appear at the Windows start sequence.
If you want you can offer your bootskin to the general public at WinCustomize.com.
You have to register for free to do so.
If you find a mistake or a better way to create bootskins, please send me a short note.
More Links for making Bootskins:
http://www.wincustomize.com/Articles.aspx?AID=97764
http://www.wincustomize.com/Articles.aspx?AID=58737
http://www.joeuser.com/index.asp?AID=1886
|
back to the top |